FAQ #
Each assignment will have an FAQ linked at the top. You can also access it by adding “/faq” to the end of the URL. The FAQ for Lab 1 is located here.
Welcome to CS 61B! #
We’re very excited to work with you this term! Before we can get started, you’ll need to have a computer that you can work on assignments on. In this class, you’ll be using real-world tools, which means that you’ll likely run into real-world problems. These are hard problems, and software engineers run into them every day! Don’t be discouraged, and make sure to ask for help if you’re stuck!
We highly recommend attending a lab section, and asking for help during lab section. If you’re working outside of a lab section, you can ask on Ed or attend office hours.
WARNING: If something isn’t working, do not keep trying random things! Instead, ask for help. Your lab TA will tell you how to join the queue. They may choose to use a whiteboard queue or the online OH queue.
In general, while you are waiting, you should move on to the next step of the assignment, whenever possible.
Partners #
Labs in CS 61B are solo. This means that you will need to write and submit your own code. For Lab 1 in particular, you will need to set up your own computer.
However, we strongly encourage working together with other students! In-person lab sections are an excellent place to find groups.
Goals and Workflow #
In this lab, we will work on setting up the software that will be used throughout this course. This includes an introduction to the terminal, git, Java, and IntelliJ. We’ll also work through a small Java program to get situated with the Java language!
INFO: This lab will be long! To help guide you through this lab, here’s a brief overview of what your workflow should look like:
- Installing Software (Java, Git, Gh)
- Terminal Tasks
- Setting Up Github and Beacon Accounts
- Git Basics and Exercises
- Setting Up Your Git Repository and Libraries (IMPORTANT!)
- Submitting to Gradescope
- IntelliJ Setup and Java Deliverable
- Final Deliverables (
magic_word.txtandArithmetic.java)
Do not skip steps!
Personal Computer Setup #
Task: Installing Software #
Installation will vary, depending on your operating system.
TASK: Follow the guide for your operating system to install the software.
The Terminal #
Terminal Guide #
In CS61B, we will be using the terminal extensively to work with git. The terminal also has some other commands that allow you to work with folders or files. We’ve compiled them in this brief guide, so please make sure to read through it here: How to Use the Terminal.
TASK: Read through the terminal guide!
Task: Terminal Test Run #
Let’s ensure that everything is working.
-
First open up your terminal. Check that git is a recognized command by typing the following command:
git --versionThe version number for git should be printed. If you see “git: command not found”, or similar, try opening a new terminal window, restarting your computer, or installing git again.
-
Second, let’s check that
javacandjavaare working.javacandjavaallow Command Line Compilation, or in other words, the ability to run Java programs directly from the command line. In practice, most developers run Java programs through an IDE like IntelliJ, so we won’t be using command line compilation this semester other than testing your setup.Start by running the following commands at your terminal.
mkdir ~/temp cd ~/temp-
Then, open your operating system’s file explorer in this directory. You can do this from the command line:
- Mac:
open . - Windows:
explorer . - Ubuntu:
gnome-open .
- Mac:
-
In this newly opened directory, create a file
HelloWorld.javawith these contents:public class HelloWorld { public static void main(String[] args) { System.out.println("Hello world!"); } }Note that in addition to the file finder or explorer, you are able to create a file using the
touchin the terminal; try creating the file usingtouch HelloWorld.javafrom the terminal! Then, open the file using your favorite text editor and copy-paste the code. -
In your terminal, enter
ls(list the files/folders in this directory). You should seeHelloWorld.javalisted. -
Run
javac HelloWorld.java. If this produces any output, then something may be wrong with your setup. Try opening a new terminal window or restarting your computer. If that still doesn’t work, see the Troubleshooting section under the directions for your operating system. -
Type
ls, you should see bothHelloWorld.javaand a freshly createdHelloWorld.class(thejavaccommand created this file). -
Run
java HelloWorld. It should print out “Hello world!” for you. If it didn’t, something is wrong with your setup! -
You’re done! You can also delete the “temp” folder and its contents as you please.
-
The screenshot below shows what we’re hoping for when we do the above steps. If you see something similar to this, your terminal setup is complete.
TASK: Familiarize yourself with the terminal and complete the steps mentioned above.
GitHub and Beacon Accounts #
Overview #
Instead of bCourses, CS 61B uses an in-house system for centralizing your grades and student information called Beacon.
In this section, we’ll set up your Beacon account as well as your CS 61B GitHub repository (“repo”), which you will need to submit all coding assignments.
Task: Setting Up Accounts #
- Create an account on GitHub. If you already have an account, you do not need to create a new one.
- Go to Beacon and follow the steps to complete your GitHub repository registration. You must be logged in to your Berkeley account to complete the Google Form syllabus quiz.
- After completing all of the steps, you should receive an email inviting you to collaborate on your course GitHub repository. Accept the email invitation to receive access to your course repository. This email will be sent to the email that you used to create your GitHub account, which may not necessarily be your Berkeley email.
WARNING: Don’t follow the instructions that GitHub says you might want to do. We have our own set of instructions later in this lab.
TASK: Follow the steps above to create your GitHub and Beacon accounts, and connect them.
Your Repository #
Your repository will have a name containing a number that is unique to you.
For instance, if your repo is called “fa23-s1”, you’ll be able to visit your
private repository at https://github.com/Berkeley-CS61B-Student/fa23-s1
(when logged into GitHub). Your student number is not “1”, so this
link will not work for you. Replace “1” with your own number to see your repo on
GitHub.
Additionally, course staff will be able to view your repository. This means you can (and should!) link to your code when asking private debugging questions in Ed or Gitbugs. No other students will be able to view your repository.
WARNING: As a reminder, you may not post code from this course publicly, even after completing the course. Doing so is a violation of our course policies and you might be subject to disciplinary action.
Git #
Git Basics #
In this course, you’ll be required to use the Git version control system, which is nearly universal out in the real world. Since the abstractions behind it are fairly tricky to understand, don’t be worried if you encounter significant frustration as you learn to use it.
TASK: Before you proceed, read up to the Remote Repositories section of the Using Git Guide. You do not need to read past that.
Task: Setting Up Git #
Before we use git, we have some short commands to configure it appropriately.
First, set the name and email that git will use with these two commands:
git config --global user.name "<your name>"
git config --global user.email "<your email>"
Set git’s default branch name:
git config --global init.defaultBranch main
Set the “merge strategy”:
git config --global pull.rebase false
We’ll also change the text editor associated with git. Sometimes, git needs
your help when inputting things like commit messages, so it will open a text
editor for you. The default editor is vim, which is notoriously difficult to use.
We recommend nano for this course, but you’re free to use whatever you’d like.
Follow the instructions here. This will configure Git’s default editor (make sure that you follow the correct instructions for your operating system).
TASK: Configure git by following the above instructions, and set your preferred editor.
Task: Git Exercise #
Now you’re ready to start using git! Your next task is to work through a small git workflow by setting up a repository and making a couple commits. At the end, you will need to be checked off by filling out the form linked on Beacon.
INFO: If you need help with creating directories, creating files, changing directories, etc., refer back to How to Use the Terminal. Another resource that might be helpful is Section C of the Using Git Guide.
As a quick recap, you may find the following git commands useful: git init, git add,
git commit, git status, git log, git restore.
- Create a directory called
lab01-checkoff. You can put this directory anywhere on your computer (unless you have already cloned yourfa23-s***repository, in which case, you should not put this directory inside yourfa23-s***repo). - Move into the
lab01-checkoffdirectory, and initialize a git repository. - Create a file called
61b.txtin any way you’d like. In this text file, add the text “Created 61b.txt”. - Create another file called
61boba.txtin any way you’d like. In this text file, add the text “Created 61boba.txt”. - Begin tracking only
61b.txt, and create a new commit containing just this file, with the following commit message:Add 61b.txt. - Make a modification in
61b.txtby changing the text in the file to: “61b.txt changed to version 2”. - Make another commit, this time containing both
61b.txtand61boba.txt. The commit message should be:Updated 61b.txt and added 61boba.txt. -
Make one more modification to
61b.txtby changing the text in the file to: “61b.txt changed to final version”. Don’t commit this version.At this point, if you were to type in
git statusandgit log, you’d see something similar to the following: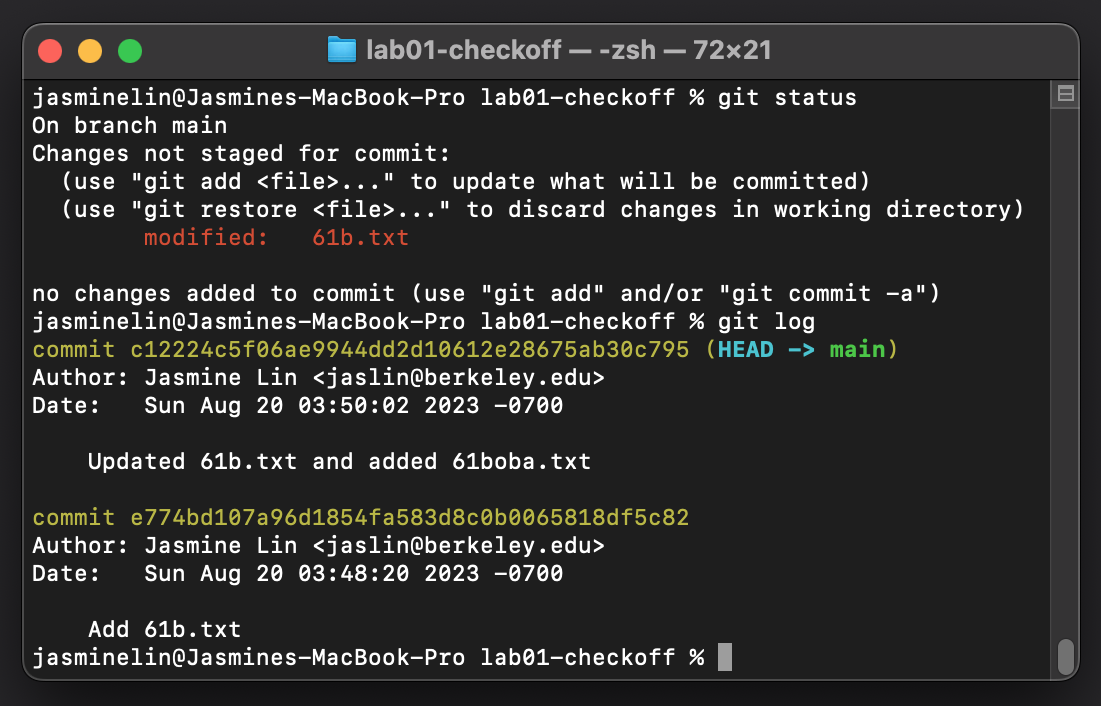
- Using git only, restore
61b.txtto the version in the most recent commit. - Using git only, restore
61b.txtto the version in the first commit.
Be sure to save this repository and directory until you complete the asynchronous checkoff form on beacon and obtain a magic word.
TASK: Do the steps above, then get checked off by filling out the Beacon form.
Git and Remote Repos #
First, read the Remote Repositories section of the Using Git Guide.
In this course, you’ll be required to submit your code using git to your course GitHub repository that you created in Account Setup. This is for several reasons:
- To spare you the incredible agony of losing your files.
- To submit your work for grading and to get results back from the autograder.
- To save you from the tremendous anguish of making unknown changes to your files that break everything.
- To ensure that we have easy access to your code so that we can help if you’re stuck.
- To dissuade you from posting your solutions on the web in a public GitHub repository. This is a major violation of course policy!
- To expose you to a realistic workflow that is common on every major project you’ll ever work on in the future.
Task: Git Repository and Java Libraries #
Java Libraries #
Like in Python, we sometimes want to use libraries that others wrote. Java dependency management is a bit of a mess, so we instead provide a git repo that contains all the dependencies that we will use in this course.
Navigate to the folder where you would like to store your libraries. For this lab, we’ll assume that you placed all your stuff in a folder named cs61b. You can pick a different name if you would like to.
To go into that folder, cd into it:
cd cs61b
Once inside the folder, run:
git clone https://github.com/Berkeley-CS61B/library-fa23
Below is the directory structure of library-fa23. Look inside the folder using
ls library-fa23 and make sure you see the .jar files listed below. There are many more,
but we only list the first few. If you’re using your operating system’s file explorer,
the jar part might not show up in the filenames, and that’s OK.
library-fa23
├── algs4.jar
├── animated-gif-lib-1.4.jar
├── antlr4-runtime-4.11.1.jar
├── apiguardian-api-1.1.2.jar
└── ...
TASK: Follow the instructions above to get the course libraries.
Configure Personal Repository #
Now, it’s time to clone your personal repository. As you did with the libraries, navigate to the
folder where you would like to keep your repository. We recommend that it’s the same folder as where
you stored your Java libraries (for example, cs61b).
Before we do clone your repo though, we need to login to Github. Verify that you have the Github package:
gh --version
You should see a version number displayed. If you instead see a command not found error, please install Github cli again by following the steps outlined for you operating system.
Next login with your account with the following command:
gh auth login
You’ll be asked a few questions with some options to select from. You don’t have to worry about them, simply select the first options for all of them and proceed. You’ll be provided with a one time code, and prompted to open the browser.
Enter the code in the browser window and select authorize Github. You should now be logged in!
NOTE: For Windows Users: if you run into an error that says
“could not prompt: Incorrect Function”, run winpty gh auth login instead.
The entire process should look like the below:
Once you’ve logged in, run the following command to clone your personal repository. Make sure to replace the *** with your
class repository number (you can find this repo number on Beacon).
WARNING: Do not place your repository inside the library-fa23 folder. This will cause headaches
in the future.
git clone https://github.com/Berkeley-CS61B-Student/fa23-s***.git
INFO: After cloning your terminal will report warning: You appear to have cloned
an empty repository. This is not an issue, it is just git letting you know
that there are no files in the repo.
Move into your newly created repo!
cd fa23-s***
Make sure that we’re working with the branch name we expect, main:
git branch -M main
Now, we’ll add the skeleton remote repository. We add starter code for the assignments
to skeleton, and you will pull from it (please make sure you’re in your newly created repository
before running this command!).
git remote add skeleton https://github.com/Berkeley-CS61B/skeleton-fa23.git
Listing the remotes should now show both the origin and skeleton remotes.
git remote -v
INFO: If you see an error like fatal: not a git repository make sure you have
properly moved into the fa23-s*** directory using cd.
TASK: Follow the steps above to clone and configure your repository.
At this point, your work space might look like this:
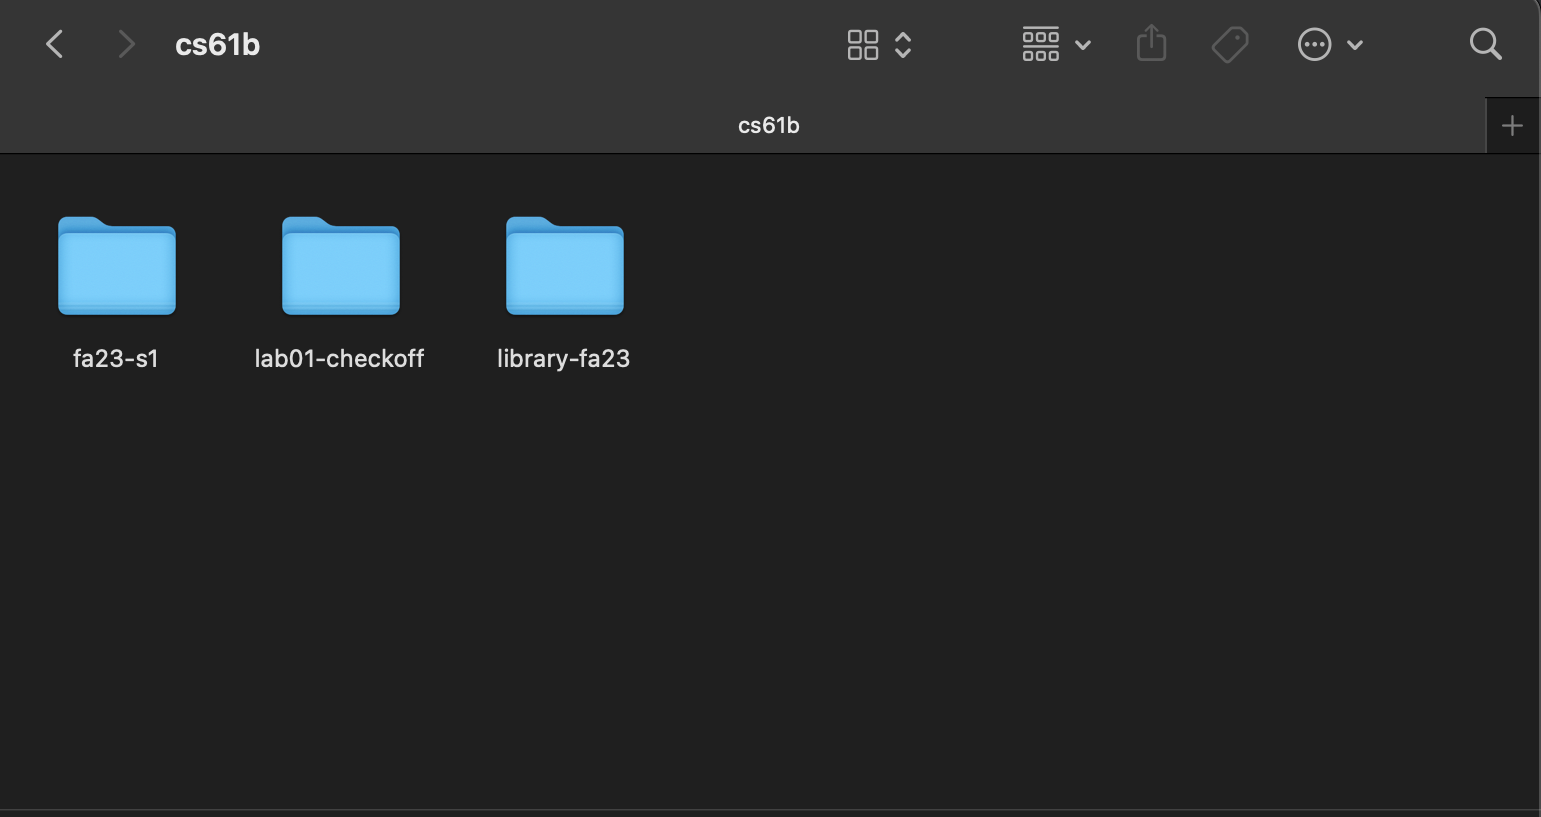
- Note that this also assuming that you did your
lab01-checkoffinside the same folder where you cloned yourfa23-s***repository andlibrary-fa23. - Your personal repository and libraries should be “separate”, such that you didn’t clone your
library-fa23inside your personal repository or vise versa. - Your workspace doesn’t have to look like this exactly. This is mainly for an idea of what it can look like.
Getting the Skeleton #
TASK: Follow the instructions in the Getting the Skeleton section of the Assignment Workflow guide to get the skeleton code for Lab 1.
WARNING: At this point, you should have a lab01 folder, with the contents
src/Arithmetic.java and tests/ArithmeticTests.java. If you do not have
these contents, don’t make it manually! Instead, pull from the skeleton or
ask a staff member.
Pushing to GitHub #
NOTE: You will need the magic word (obtained from checkoff) to complete this step.
Open the file lab01/magic_word.txt in a text editor, and edit it to contain
the magic word obtained during the git exercise.
Now stage and commit magic_word.txt (make sure you’re in your fa23-s*** repo!).
git add lab01/magic_word.txt
git commit -m "Added Magic Word"
Right now, the modified magic_word.txt is only on your computer. We want to
push these changes to the GitHub repository so that your changes can be seen by
us and Gradescope. Push these changes to the main branch on the origin
remote repo.
git push origin main
You can verify that this was successful by checking your repository online on
GitHub’s website. It should contain the updated magic_word.txt file. If it
doesn’t, make sure that your add and commit were successful. In particular,
make sure that you are in your repo, fa23-***.
TASK: Follow the instructions above to push your magic word to GitHub, and check that it appears.
Our work is now on GitHub, and ready to submit!
Task: Submitting to Gradescope #
Although we use GitHub to store our programming work, we use Gradescope to actually grade it. The last step is to submit your work with Gradescope, which we use to autograde programming assignments.
INFO: We added everyone’s CalCentral email to Gradescope on the first day of labs. Make sure to login using the email address listed on CalCentral.
If you’re having trouble accessing the course on Gradescope or would like to use a different email address, ask your TA!
WARNING: As above, we strongly encourage you to make frequent commits! Lack of proper version control will not be considered an excuse for lost work, particularly after the first week.
TASK: Follow the instructions in the Submitting to Gradescope section of the Assignment Workflow guide to submit to Gradescope.
Once you submit, open this dropdown. No, you’re not done with the lab yet.
At this point, Gradescope should show you something similar to the following:
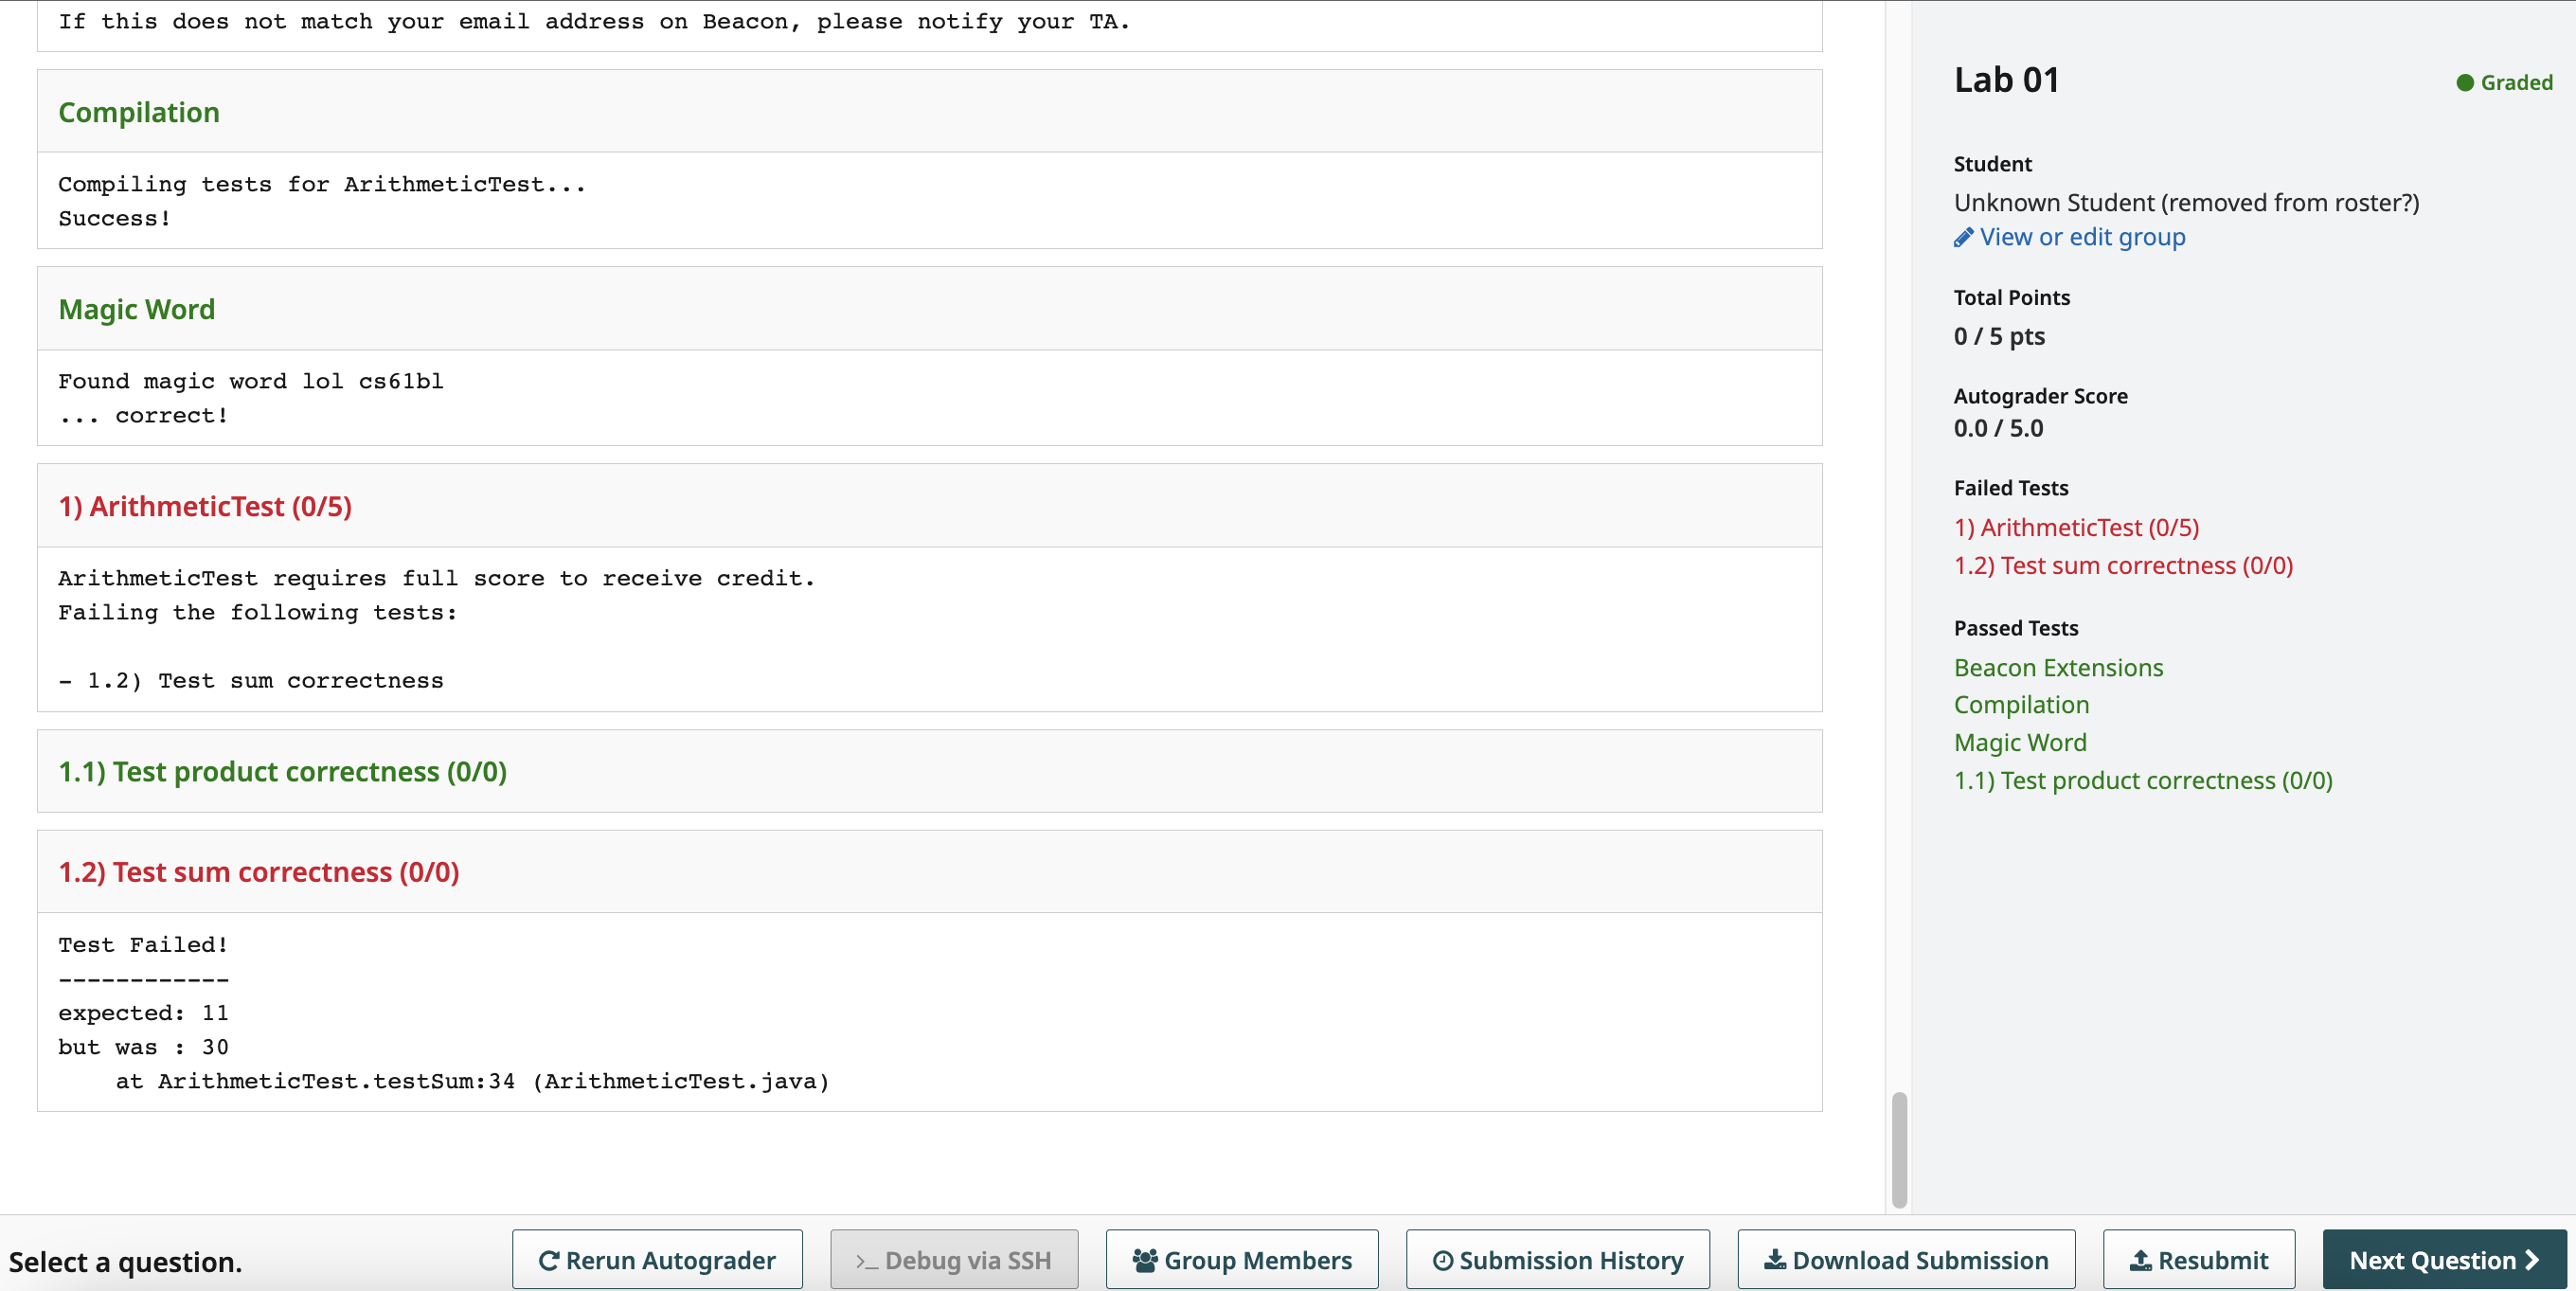
In CS 61B, we use automated tests to check that your code is written correctly. In your first submission, you:
- Should be passing “Magic Word”, if you received the magic word
- Should be passing “Test product correctness”
- Should not be passing “Test sum correctness”
We’ll now show you how you can work on and check your code locally, which is much easier than checking on Gradescope every time.
Task: IntelliJ Setup #
IntelliJ is an Integrated Development Environment or IDE. An IDE is a single program which combines typically a source code editor, tools to compile and run code, and a debugger. Some IDEs like IntelliJ contain even more features such as an integrated terminal and a graphical interface for git commands. Finally, IDEs also have tools like code completion which will help you write Java faster.
We highly recommend using IntelliJ. Our tests are written to run in IntelliJ, and we will explicitly use its debugger in later labs. Additionally, IntelliJ is an industry-standard tool that you will almost certainly encounter if you work with Java again in the future.
We will assume that you are using IntelliJ, and will not offer support for other editors, including VSCode.
WARNING: IntelliJ is a real world, industrial software development application. There are many features that we will not use, and you will sometimes encounter situations that do not make sense. Ask for help if you are stuck or something seems broken! It can be very hard to guess the right thing to do in IntelliJ. Check out the IntelliJ WTFS Guide for solutions to some common problems.
Before continuing, make sure that you have completed all above tasks besides the git exercise:
- You have installed Java 17 or higher.
- You have successfully created your local repo for the class on your own
machine. This is the
fa23-s***repository you earlier. - You have pulled from the skeleton, and you have a
lab01directory.
Installing IntelliJ #
- Download the Community Edition of IntelliJ from the JetBrains website. As a student you can actually get a student license for the Ultimate version, but there are not any additional features that we will use for this class. It is recommended and assumed that you proceed with the Community Edition. The Ultimate Version will be the first one you see when you click on the link - make sure to scroll down for the Community Version.
NOTE: If you have an M1 or M2 Mac, select “.dmg (Apple Silicon)”. Otherwise, select “.dmg (Intel).”
-
After selecting the appropriate version for your OS, click download and wait a few minutes for the file to finish downloading.
-
Run the installer. If you have an older version of IntelliJ, you should uninstall it at this time and replace it with this newer version.
INFO: While IntelliJ downloads, you can read / skim our Using IntelliJ Guide. You don’t need to read or internalize all of this to complete the lab. IntelliJ is complicated, but the core features should feel somewhat familiar to text editors you have used in the past.
Installing Plugins #
Open IntelliJ. Then follow the steps below.
Make sure you’re running IntelliJ Version 2021.2 or later before continuing. This is because we will use Java 17 or later. We are using IntelliJ Version 2023.2 (in the images), which has an updated user interface. Note that there might be older screenshots of IntelliJ in this lab - that is fine since the general layout is still relatively consistent.
-
In the Welcome window, click the “Plugins” button in the menu on the left.
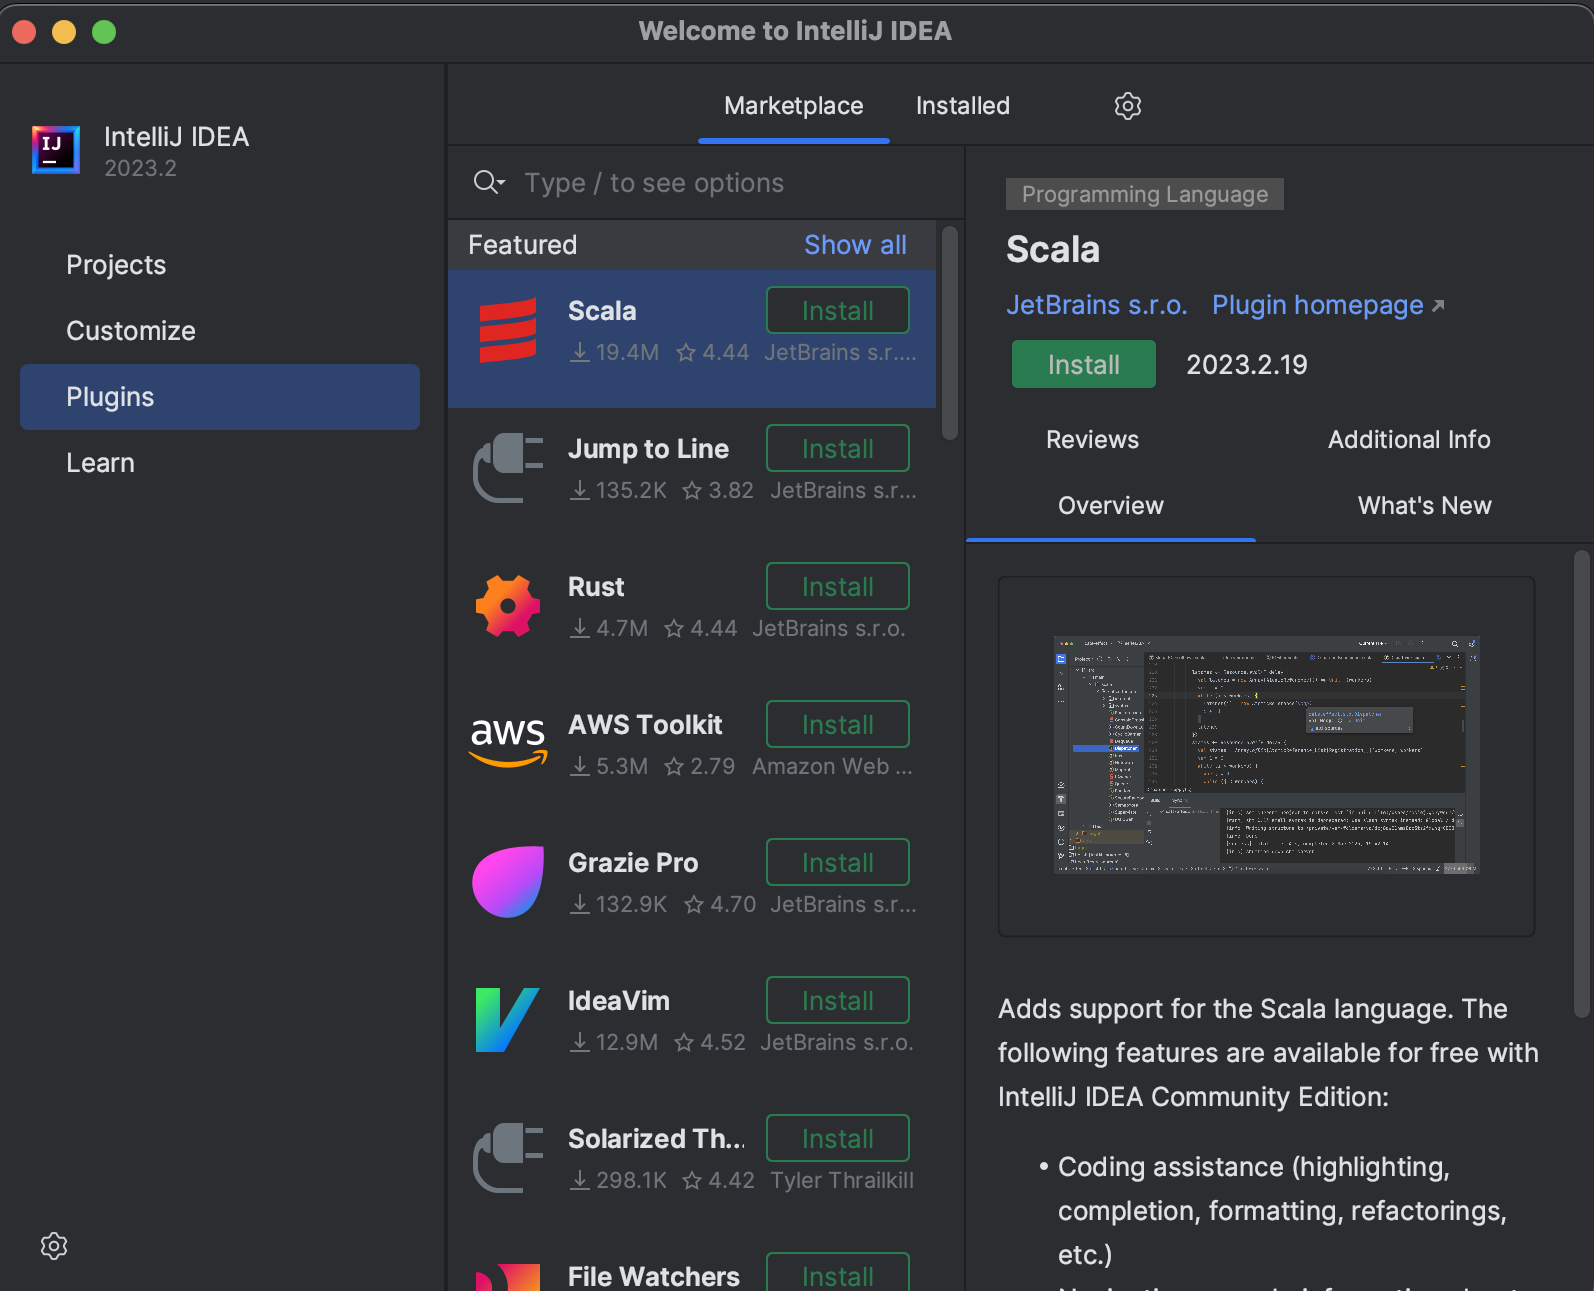
-
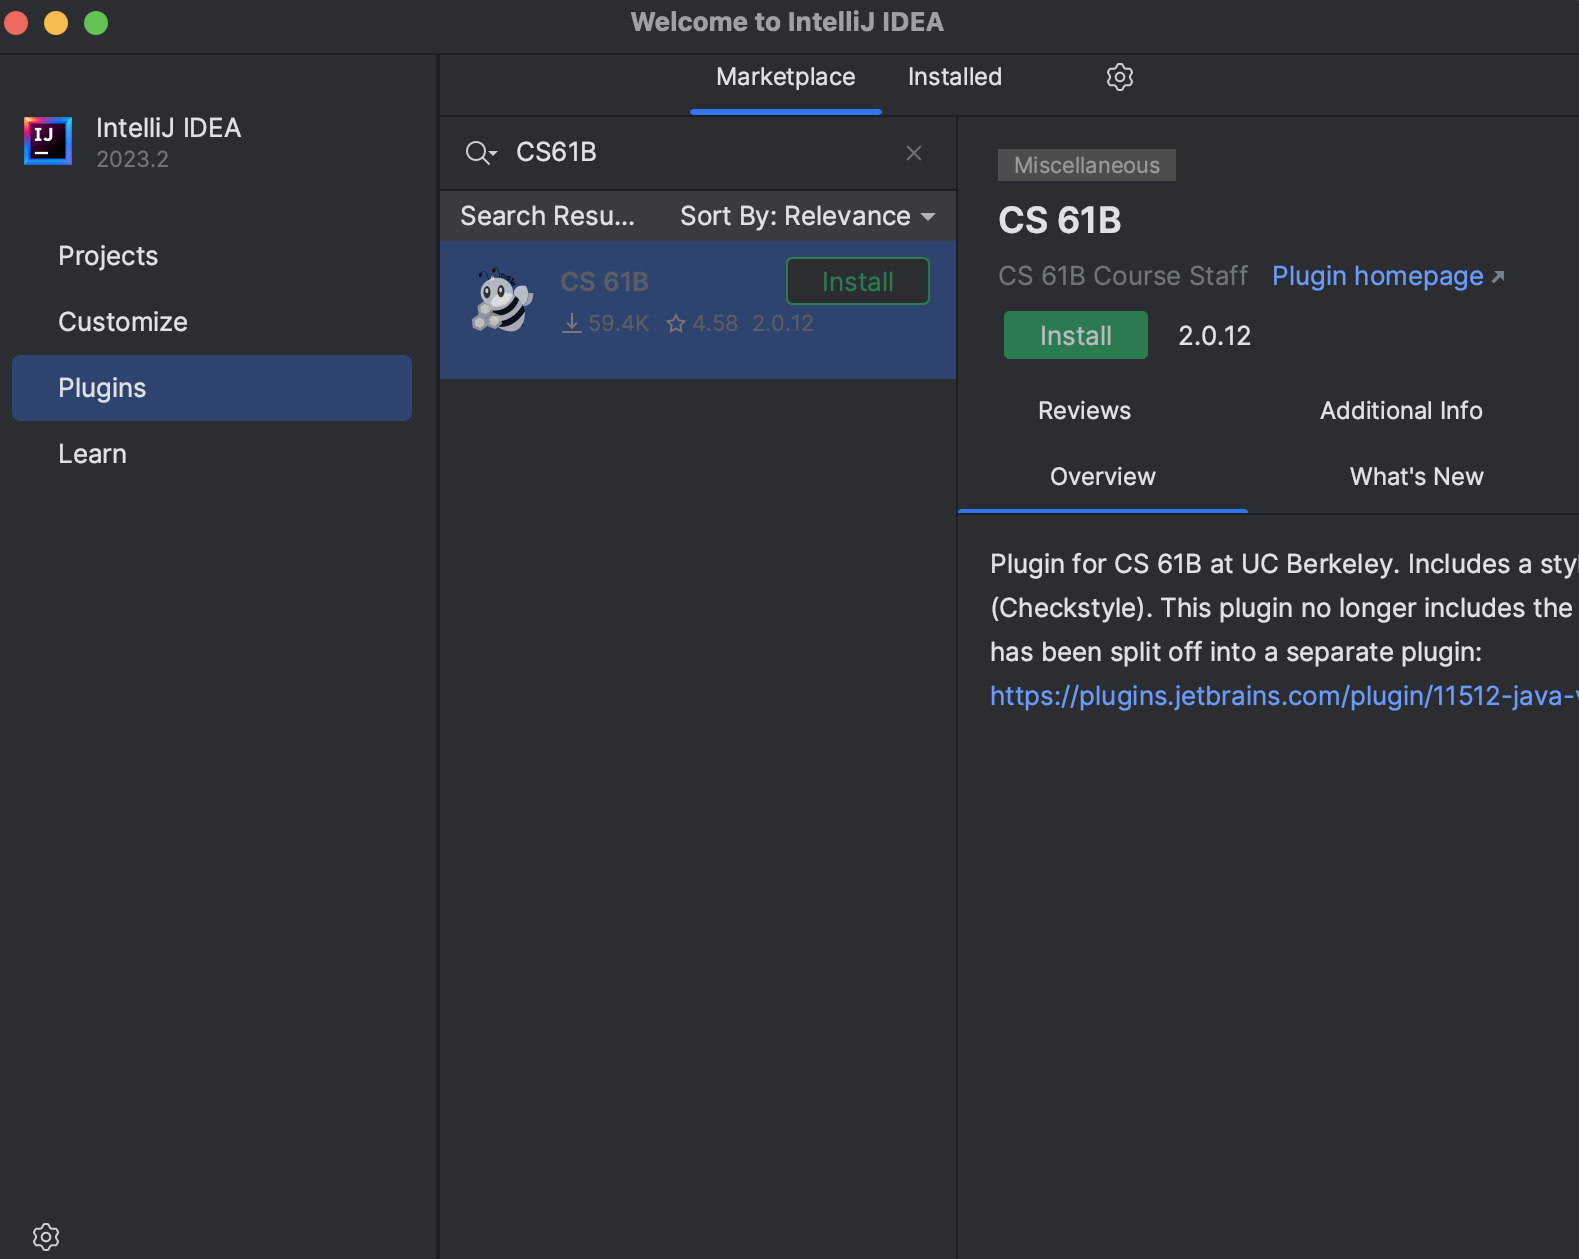
On the window that appears, click “Marketplace” and enter “CS 61B” in the search bar at the top. The CS 61B plugin entry should appear. If you click the autocomplete suggestion, a slightly different window from what is shown below may appear – this is okay.
-
Click the green Install button, and wait for the plugin to download and install.
If you have the plugin installed from a prior term, make sure to update it.
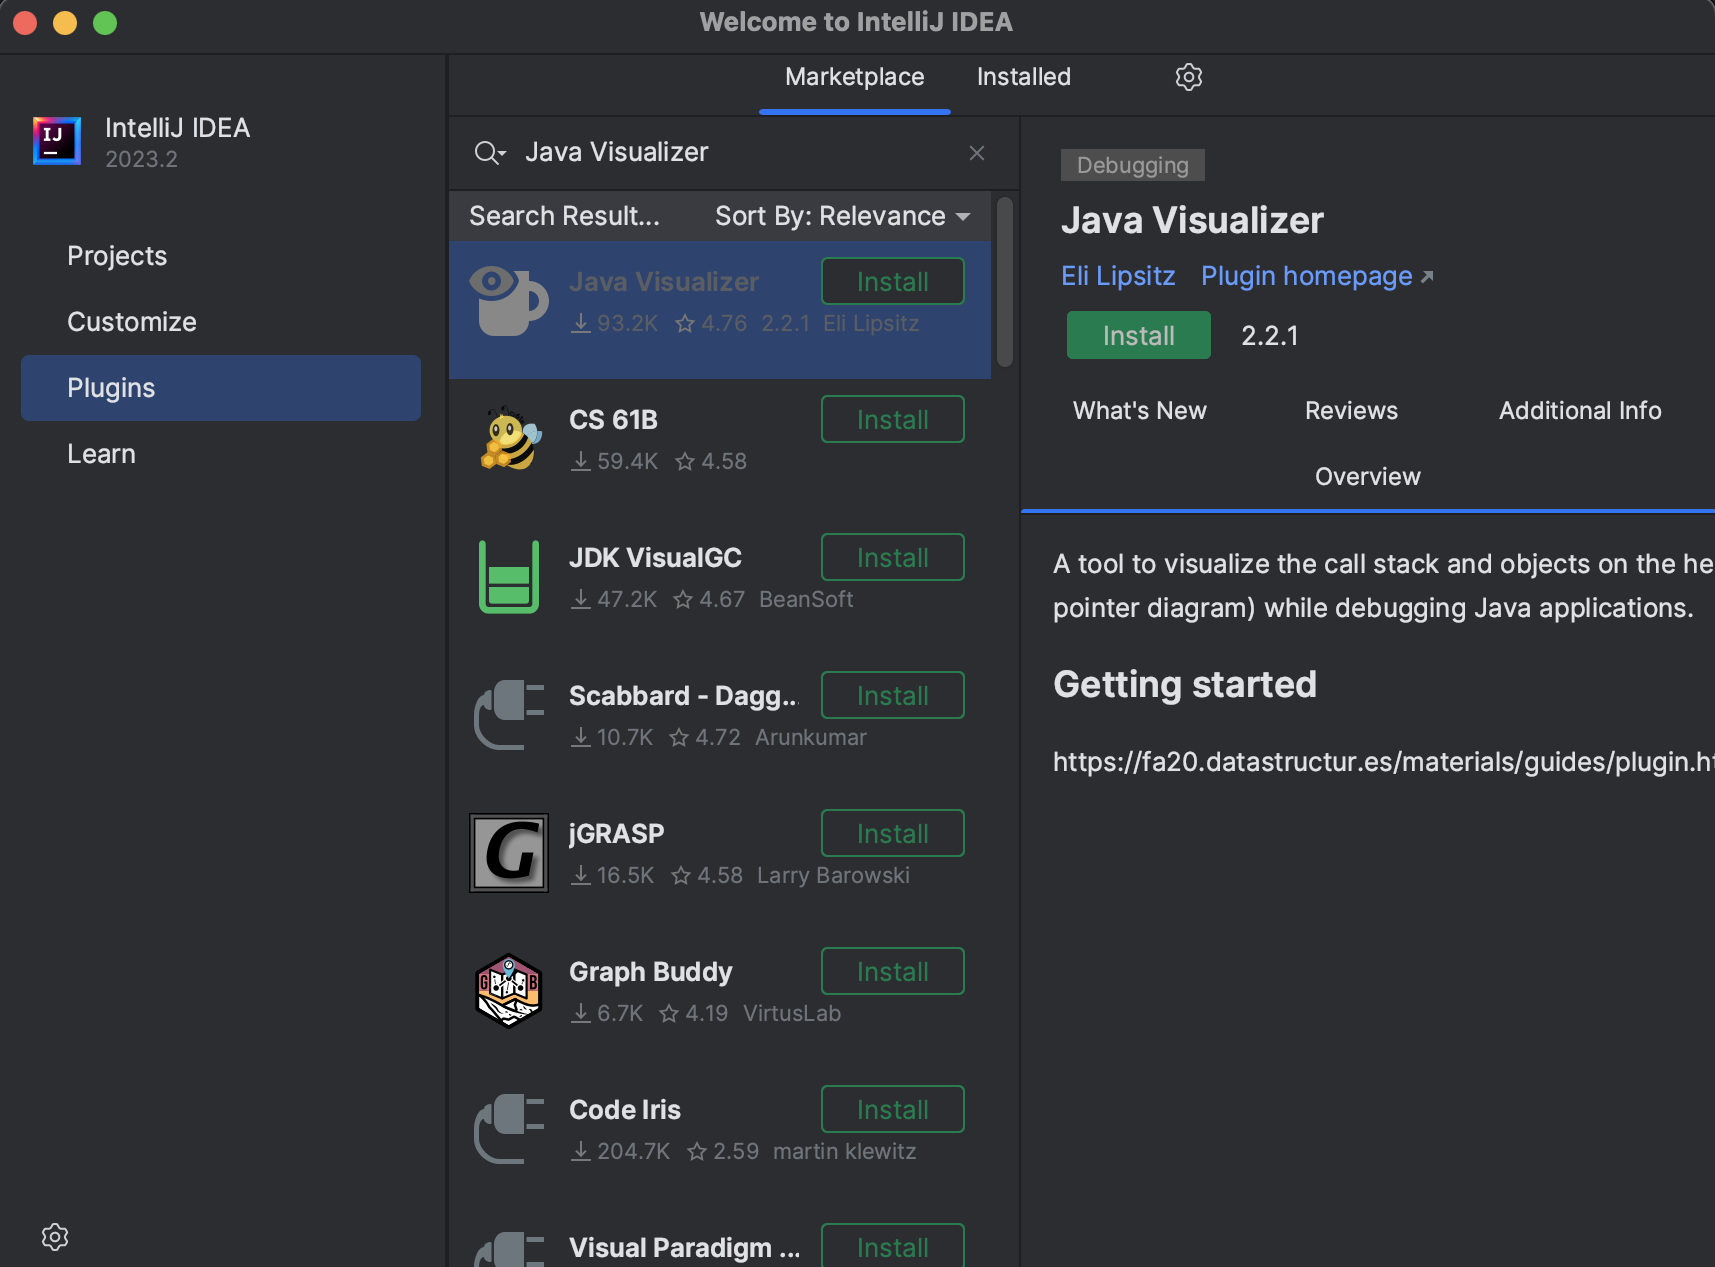
-
Now, search for “Java Visualizer”, and click the green Install button to install the plugin.
-
Restart (close and reopen) IntelliJ.
For more information on using the plugins, read the plugin guide. You don’t have to read this right now.
Creating Projects #
TASK: Follow the instructions in the
Opening in IntelliJ section of the Assignment Workflow guide
to open lab01.
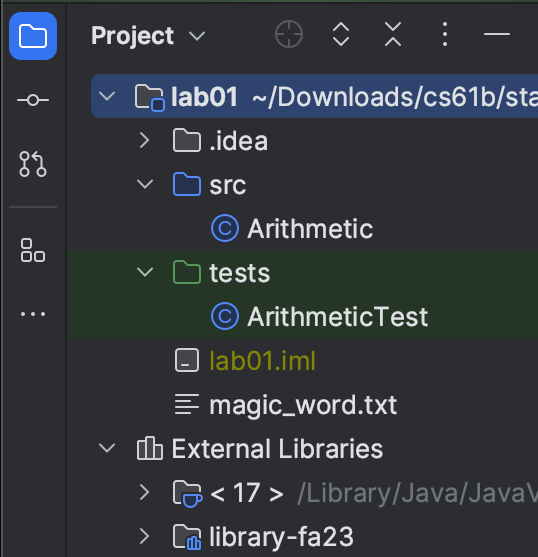
Once you’ve done this, you should see at least these three files in the left pane:
magic_word.txt, which should contain the magic word you added.src/Arithmetic, a Java file which contains your first programming exercise.tests/ArithmeticTest, another Java file which will check thatArithmeticis implemented correctly.
When you open Arithmetic and ArithmeticTest, you should not see any red
text or red squiggles.
IntelliJ Test #
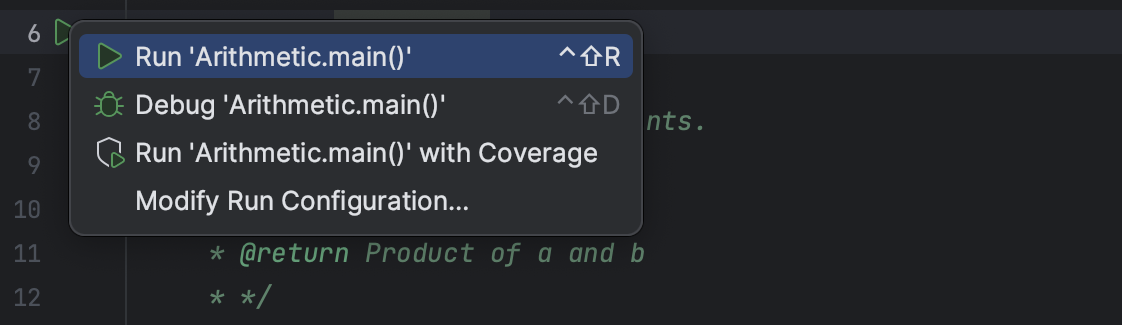
To test if everything is working correctly, run the Arithmetic class by
opening the file, clicking on the green triangle next to
public class Arithmetic, then clicking “Run ‘Arithmetic.main()’”.
There are other ways to run the main method.
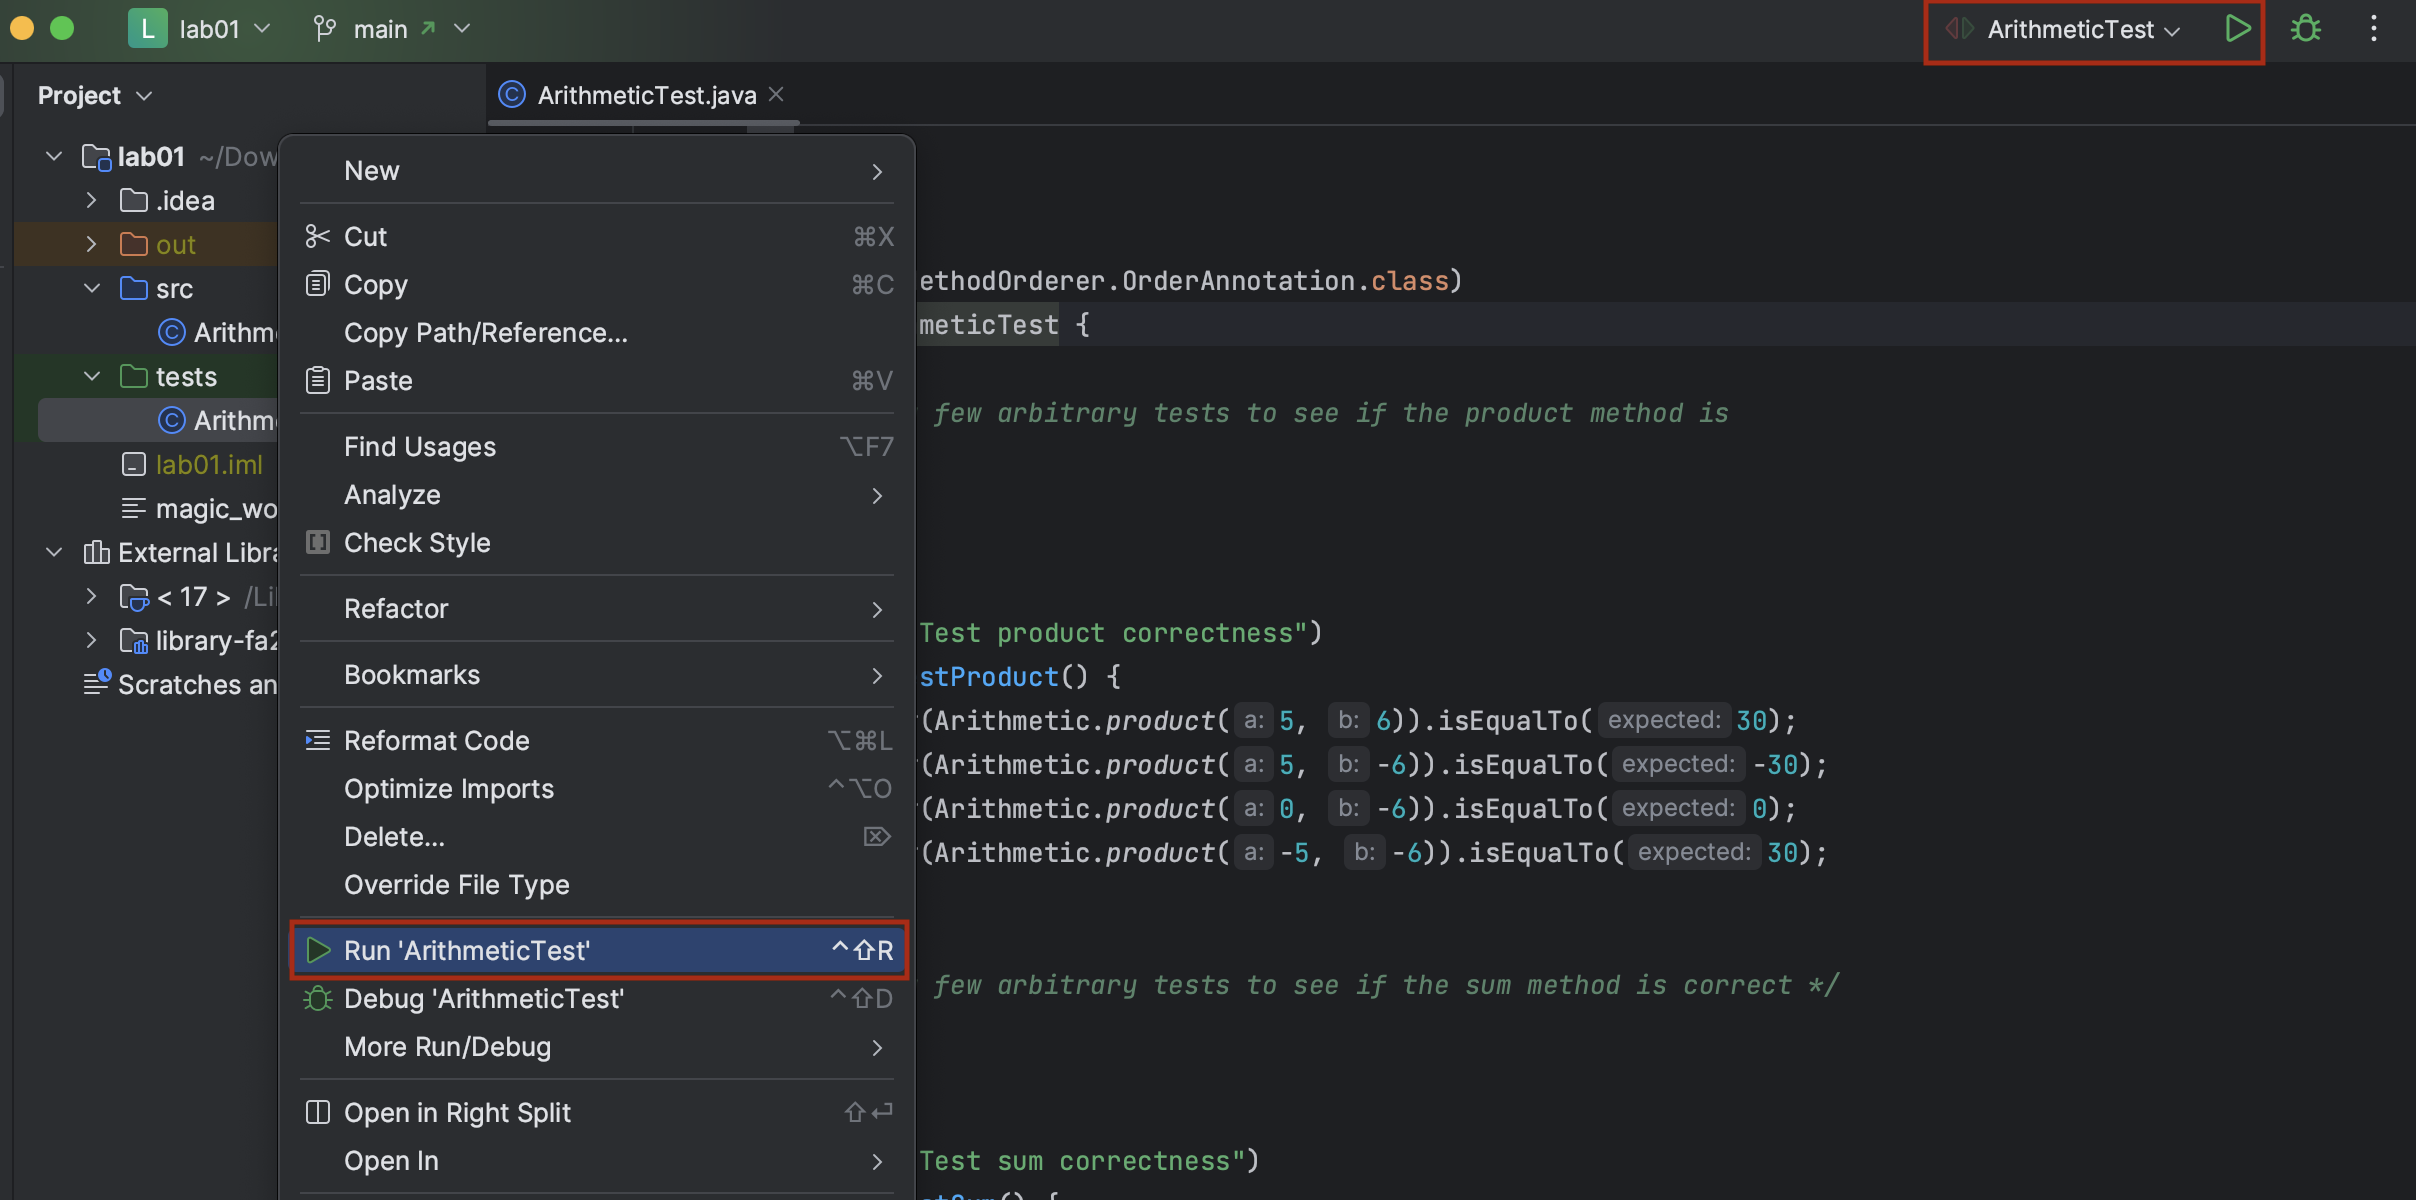
Assuming that the file has a main method, you can right click on the file in the project view
and navigate to [filname].main(). You can also run it through the green arrow in the top right (outlined
in red).
You should see a console pop up, prompting you to enter a number:
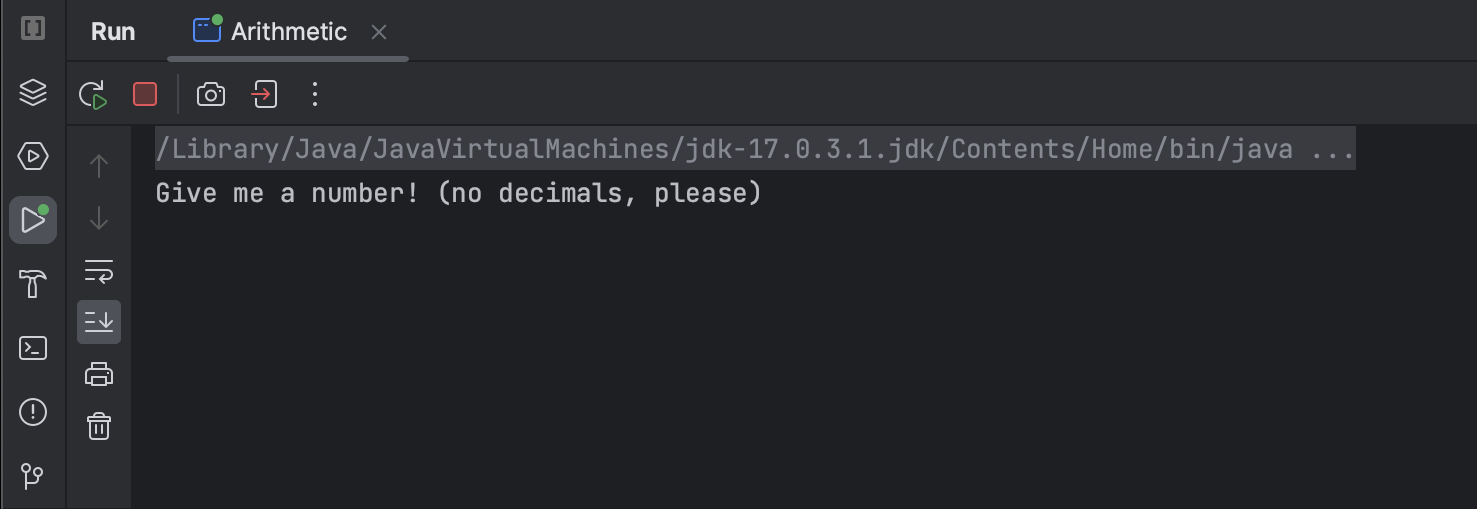
If you follow the prompts, you will (probably) see something wrong! Don’t fix it yet.
Testing Your Code #
While we could run the Arithmetic file again and again to check that our
code works correctly, it would take a lot of time to type into the program each
time, and manually check that the output is correct. Instead, we use tests.
Open ArithmeticTest, and click the green triangle(s) next to the
public class ArithmeticTest. This will run the tests that we have provided
in this assignment. At this point, you will see the following:
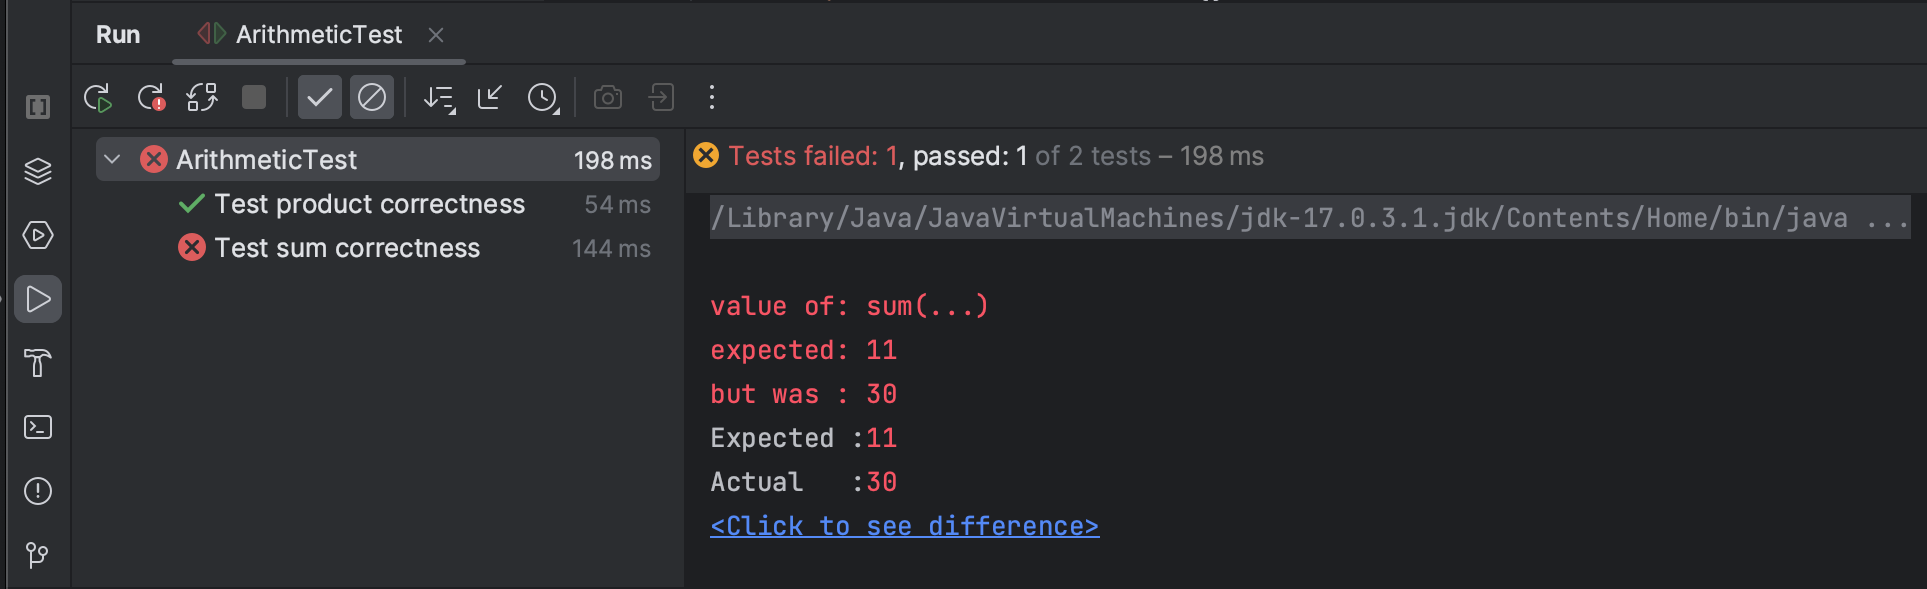
The green checkmark ( ) indicates
tests that you have passed, while the yellow X
(
) indicates
tests that you have passed, while the yellow X
( ) indicates tests that you have
failed. Don’t worry about the doubled output; this is a strange quirk of
IntelliJ.
) indicates tests that you have
failed. Don’t worry about the doubled output; this is a strange quirk of
IntelliJ.
INFO: This should look familiar. The test that failed on Gradescope is the same test that we see here! We can run these tests locally, very easily!
TASK: Fix the bug in Arithmetic.java so that the tests pass.
Task: Saving Your Work using Git and GitHub #
As you are making changes to your code, it is good practice to save your work often. We have briefly discussed the commands, but now we will explain how they should be used in practice. In the case that you ever want to go back to another version of your code, it is better to have more options to roll back to. The next set of instructions will talk you through git’s version of saving work through snapshots of your file system called commits.
-
After you have made some changes to the code within our local repository, git will take notice of these changes. To see the current state of your local repository, use the command
git status. Run this and try to interpret the results. Do they make sense to you or do they match your intuition? It is a good habit to run this before running other git commands to know what the state of things are. -
To save work that we have completed on a file, we first stage the file, and then we can commit it. We stage a file with the command
git add. This does not save the file, but it marks it to be saved the next time you commit. The two below commands show what saving work looks like in a git repository. Forgit adddepending on what directory you are in, the path to the file you are adding might differ (usegit statusto see the path).The
-m "Completed Arithmetic.java"part of the commit command specifies a message to be attached to this snapshot. You should always have a commit message to identify what exactly happened in this commit. As an example workflow:git add lab01/src/Arithmetic.java git commit -m "lab01: Completed Arithmetic.java"If you run
git status, you will see thatYour branch is ahead of 'origin/main'. You will also see that the staged changes are no longer staged, and are instead committed. If you haven’t edited since staging, you shouldn’t have any changes not staged for commit. -
We want to push these changes to the GitHub repository so that your changes can be seen by us and Gradescope. Your changes will also be available to
pulled if you had your repo initialized in other places or other computers.git push origin maingit statuswill now show thatYour branch is up to date with 'origin/main'.
WARNING: Get into the habit of saving your files and doing the git commit step often
(i.e. every 15 minutes). It will be incredibly helpful when you mess things up,
since it allows you to back out of changes and to see what you have changed
recently.
Basically, right when you sit down to work in your repository, first git pull
to make sure you are starting with the most recent code. While you are working,
frequently commit. When you are finished, git push so all your changes are
uploaded and ready for you to pull again next time.
TASK: Follow the instructions (again!) in the Submitting to Gradescope section of the Assignment Workflow guide to submit to Gradescope. This time, you should receive a full score on the lab.
Deliverables #
As a reminder, this assignment has an FAQ page.
There are two required files, all inside the lab01 directory:
magic_word.txt- You should have received the correct magic word from completing the git checkoff.
Arithmetic.java- You should have fixed the bug so that the tests pass. We check this file with an autograder! For this lab, the autograder tests are the same as the ones you have on your computer.
Be sure to submit again according to the submission section, so that you submit your completed lab. Congratulations on finishing your first CS 61B lab!
Optional: Josh Hug’s Color Schemes #
Per Josh Hug:
I’m not a big fan of the default IntelliJ colors.
Sunburst: If you want the color scheme that is used in most of the lecture videos, this is a custom color scheme I made which is a very close imitation of the great Sunburst theme for Sublime. To use Sunburst, download hug_sunburst, and import it using the “File → Manage IDE Settings → Import Settings” option in IntelliJ. You might end up with large text, which I use for recording videos. To adjust the size of the font in Intellij to your liking, see this link.
Mariana Pro: In 2022, I switched over to Mariana Pro. It doesn’t feel as much like being in a forest as Sunburst, but it has more color depth. To get Mariana Pro, go to the same plug-in shop that you used to install the CS 61B plugin, and search for “Mariana Pro”. This plugin was made by Thibault Soulabaille. Note that I prefer a pure black background, whereas Mariana Pro is a dark grey. You can change the background color using these directions.